Looking for provider-level caching? Learn about Prompt Caching to cache prompts directly on provider servers (OpenAI, Anthropic, etc.) for reduced token costs.
Why Helicone Caching
Save Money
Avoid repeated charges for identical requests while testing and debugging
Instant Responses
Serve cached responses immediately instead of waiting for LLM providers
Handle Traffic Spikes
Protect against rate limits and maintain performance during high usage
How It Works
Helicone’s caching system stores LLM responses on Cloudflare’s edge network, providing globally distributed, low-latency access to cached data.Cache Key Generation
Helicone generates unique cache keys by hashing:- Cache seed - Optional namespace identifier (if specified)
- Request URL - The full endpoint URL
- Request body - Complete request payload including all parameters
- Relevant headers - Authorization and cache-specific headers
- Bucket index - For multi-response caching
Cache Storage
- Responses are stored in Cloudflare Workers KV (key-value store)
- Distributed across 300+ global edge locations
- Automatic replication and failover
- No impact on your infrastructure
Quick Start
1
Enable caching
Add the
Helicone-Cache-Enabled header to your requests:2
Make your request
Execute your LLM request - the first call will be cached:
3
Verify caching works
Make the same request again - it should return instantly from cache:
Configuration
string
required
Enable or disable caching for the request.Example:
"true" to enable cachingstring
Set cache duration using standard HTTP cache control directives.Default:
"max-age=604800" (7 days)Example: "max-age=3600" for 1 hour cachestring
Number of different responses to store for the same request. Useful for non-deterministic prompts.Default:
"1" (single response cached)Example: "3" to cache up to 3 different responsesstring
Create separate cache namespaces for different users or contexts.Example:
"user-123" to maintain user-specific cachestring
Comma-separated JSON keys to exclude from cache key generation.Example:
"request_id,timestamp" to ignore these fields when generating cache keysAll header values must be strings. For example,
"Helicone-Cache-Bucket-Max-Size": "10".Examples
- Combined with Provider Caching
- Development Testing
- User-Specific Caching
Use both provider caching and Helicone caching together by ignoring provider-specific cache keys:This approach:
Learn more about provider caching here.
- Uses OpenAI’s prompt caching for faster processing of repeated context
- Uses Helicone’s caching for instant responses to identical requests
- Ignores
prompt_cache_keyso Helicone cache works across different OpenAI cache entries - Maximizes cost savings by combining both caching strategies
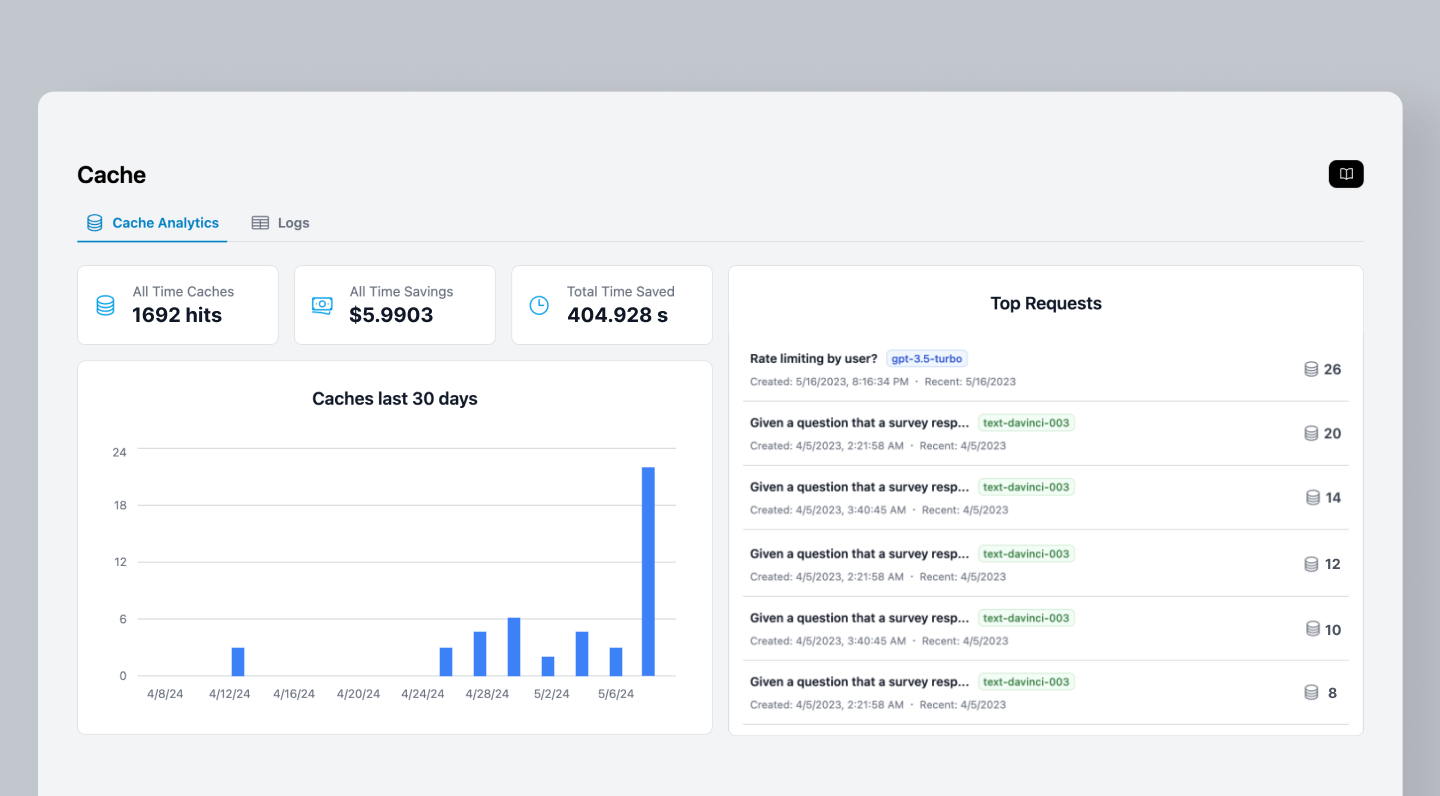
Dashboard view of cache hits, cost and time saved
Understanding Caching
Cache Response Headers
Check cache status by examining response headers:Cache Duration
Set how long responses stay cached using theCache-Control header:
- 1 hour:
max-age=3600 - 1 day:
max-age=86400 - 7 days:
max-age=604800(default) - 30 days:
max-age=2592000
Maximum cache duration is 365 days (
max-age=31536000)Cache Buckets
Control how many different responses are stored for the same request:- Size 1 (default): Same request always returns same cached response (deterministic)
- Size > 1: Same request can return different cached responses (useful for creative prompts)
- Response chosen randomly from bucket
Maximum bucket size is 20. Enterprise plans support larger buckets.
Cache Seeds
Create separate cache namespaces using seeds:Ignore Keys
Exclude specific JSON fields from cache key generation:This feature only works with JSON request bodies. Non-JSON bodies will use the original text for cache key generation.
- Ignore tracking IDs that don’t affect the response
- Exclude timestamps for time-independent queries
- Remove session or user metadata when caching shared content
- Ignore
prompt_cache_keywhen using provider caching alongside Helicone caching
Cache Limitations
- Maximum duration: 365 days
- Maximum bucket size: 20 (enterprise plans support more)
- Cache key sensitivity: Any parameter change creates new cache entry
- Storage location: Cached in Cloudflare Workers KV (edge-distributed), not your infrastructure
Related Features
Prompt Caching
Cache prompts on provider servers for reduced token costs and faster processing
Custom Properties
Add metadata to cached requests for better filtering and analysis
Rate Limiting
Control request frequency and combine with caching for cost optimization
User Metrics
Track cache hit rates and savings per user or application
Need more help?
Need more help?
Additional questions or feedback? Reach out to
help@helicone.ai or schedule a
call with us.